

Your taste buds are in for a treat with this Air Fryer Chicken Breast! Tender, juicy chicken gets a bright pop of citrus and zesty garlic-herb goodness, crisping up into golden perfection thanks to your trusty air fryer. Each bite delivers a satisfying crunch that gives way to savory, melt-in-your-mouth meat. With a simple squeeze of lemon juice and a sprinkle of smoked paprika, it’s meal prep made glamorous. Ready in under 20 minutes, this playful recipe turns busy weeknights into flavor-packed feasts. Serve alongside steamed broccoli or a fresh salad, and watch this chicken steal the show every time!
Table of Contents
Why You’ll Love This Air Fryer Chicken Breast
- Trust me, you’re going to love this juicy flavor explosion!
- This one’s a game-changer for quick meal prep.
- Perfectly cooked every time, no more dry chicken!
- Healthier than traditional frying, but just as tasty!
- Easy cleanup means more time to enjoy your meal!
Recipe Snapshot
| Feature | Details |
|---|---|
| Category | Main Course |
| Cuisine | American |
| Prep Time | 10 minutes |
| Cook Time | 20 minutes |
| Extra Time | 5 minutes (resting) |
| Total Time | 35 minutes |
| Dietary | Low Carb |
| Serves | 4 |
| Best Served | With your favorite sides! |
Ingredients
Gather these flavorful ingredients for a succulent Air Fryer Chicken Breast!

- 4 chicken breasts – boneless and skinless
- 2 tbsp olive oil – for moisture and flavor
- 1 tsp paprika – for a smoky taste
- 1 tsp garlic powder – adds delicious aroma
- 1 tsp dried oregano – for an herby note
- salt and pepper – to taste for seasoning
How to Make Air Fryer Chicken Breast
This juicy and flavorful Air Fryer Chicken Breast is perfect for meal prep or a delightful dinner. With a preparation time of just 10 minutes and a cooking time of 18-20 minutes, you’ll have a delicious meal ready in no time. Don’t forget to let it rest for 5 minutes before serving!
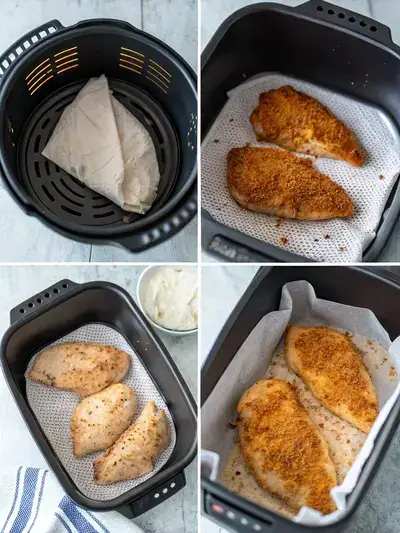
Step 1: Preheat the Air Fryer
Preheat your air fryer to 400°F (200°C). This ensures your chicken cooks evenly and gets that perfect crispy exterior.
Step 2: Prepare the Chicken
Pat the chicken breasts dry with paper towels. This helps the oil and seasonings stick better. Rub the chicken with a drizzle of olive oil for added moisture and flavor.
Step 3: Season the Chicken
Evenly season the chicken with paprika, garlic powder, oregano, salt, and pepper. Feel free to adjust the spices to your taste. Make sure every inch is coated!
Step 4: Cook the Chicken
Place the seasoned chicken in the air fryer basket. Cook for 18-20 minutes, flipping halfway through. Use a meat thermometer to check that the internal temperature reaches 165°F (75°C).
Step 5: Let it Rest
Once cooked, let the chicken rest for 5 minutes. This allows the juices to redistribute, making your chicken even juicier!
Pro Tips for Making Air Fryer Chicken Breast
- Brine the chicken in a saltwater solution for at least 30 minutes to enhance juiciness.
- Use a meat thermometer to ensure the internal temperature reaches 165°F for perfectly cooked chicken.
- Let the chicken rest for a few minutes after cooking to lock in the juices.
- Experiment with different marinades or seasonings to find your favorite flavor profile.
- Don’t overcrowd the air fryer basket; cook in batches for even cooking and crispiness.
How to Serve this Air Fryer Chicken Breast
- Slice and serve over a fresh garden salad with a zesty lemon vinaigrette.
- Pair with roasted vegetables for a colorful and nutritious meal.
- Shred and mix into tacos with avocado, salsa, and cilantro.
- Serve alongside quinoa or brown rice for a hearty, wholesome dinner.
- Top with your favorite barbecue sauce and serve in a sandwich with coleslaw.
- Enjoy with a side of creamy mashed potatoes and steamed green beans.
Make Ahead and Storage
You can easily prepare and store your Air Fryer Chicken Breast for later enjoyment:
Storing Air Fryer Chicken Breast Leftovers
- Allow chicken to cool completely before storing.
- Place in an airtight container.
- Refrigerate for up to 4 days.
Freezing Air Fryer Chicken Breast
- Wrap chicken tightly in plastic wrap or foil.
- Place in a freezer-safe bag or container.
- Freeze for up to 3 months for best quality.
Reheating Air Fryer Chicken Breast
- Thaw in the refrigerator overnight if frozen.
- Reheat in the air fryer at 350°F for 5-7 minutes.
- Check for internal temperature of 165°F before serving.

Air Fryer Chicken Breast
Equipment
- 1 Air Fryer Ensure it can fit 4 chicken breasts.
- 1 Meat Thermometer To check the internal temperature.
Ingredients
Ingredients
- 4 pieces chicken breasts boneless and skinless
- 2 tbsp olive oil for moisture and flavor
- 1 tsp paprika for a smoky taste
- 1 tsp garlic powder adds delicious aroma
- 1 tsp dried oregano for an herby note
- to taste salt and pepper for seasoning
Instructions
Instructions
- Step 1: Preheat your air fryer to 400°F (200°C). This ensures your chicken cooks evenly and gets that perfect crispy exterior.
- Step 2: Pat the chicken breasts dry with paper towels. This helps the oil and seasonings stick better. Rub the chicken with a drizzle of olive oil for added moisture and flavor.
- Step 3: Evenly season the chicken with paprika, garlic powder, oregano, salt, and pepper. Feel free to adjust the spices to your taste. Make sure every inch is coated!
- Step 4: Place the seasoned chicken in the air fryer basket. Cook for 18-20 minutes, flipping halfway through. Use a meat thermometer to check that the internal temperature reaches 165°F (75°C).
- Step 5: Once cooked, let the chicken rest for 5 minutes. This allows the juices to redistribute, making your chicken even juicier!
Notes
| Nutrient | Amount per Serving |
|---|---|
| Calories | 165 |
| Fat | 7g |
| Protein | 31g |
| Carbs | 0g |
You can visit our breakfast, lunch, dinner and desserts recipes from here:
Breakfast, Lunch, Dinner, Desserts
FAQs
Here’s a helpful FAQ about this recipe:
1. How do I ensure my Air Fryer Chicken Breast stays juicy?
To keep your chicken breast juicy, make sure to marinate it for at least 30 minutes before cooking. Using a mixture of olive oil, lemon juice, and your favorite spices can help lock in moisture. Additionally, avoid overcooking by checking the internal temperature with a meat thermometer; it should reach 165°F (75°C).
2. Can I use frozen chicken breasts in the air fryer?
Yes, you can cook frozen chicken breasts in the air fryer! Just increase the cooking time by about 5-10 minutes, and ensure they reach the safe internal temperature of 165°F (75°C). It’s best to season them after they have thawed slightly during cooking for better flavor absorption.
3. What can I serve with Air Fryer Chicken Breast?
Air Fryer Chicken Breast pairs wonderfully with a variety of sides! Consider serving it with roasted vegetables, a fresh salad, or quinoa for a healthy meal. You can also slice it up and add it to wraps or sandwiches for a delicious lunch option.
4. How do I store leftover Air Fryer Chicken Breast?
To store leftover chicken breast, let it cool completely, then place it in an airtight container. It can be kept in the refrigerator for up to 4 days. For longer storage, consider freezing it; just make sure to wrap it tightly to prevent freezer burn. When ready to eat, reheat in the air fryer for a few minutes to restore its juiciness.
Final Thoughts
Now that you’ve mastered the art of making juicy Air Fryer Chicken Breast, it’s time to dig in! This dish is not just a meal; it’s a celebration of flavor and simplicity. Enjoy it with your favorite sides, and relish the satisfaction of a delicious dinner that’s quick and easy. Happy cooking!